During the downtime between Christmas and New Years, I got a question about making oddly shaped windows and niches in walls. There are plenty of ways to do this, but here’s a quick video on how to use slabs to make new custom empty openings in ArchiCAD.
The trick is to remember to give your slabs the ID wallhole or wallniche. For non-hole or niche elements put in IDs that make sense (as that will make finding the information in the GDL script much easier-if or when you need to sift through the GDL).
Once you’ve gotten comfortable with making these empty openings, it’s very easy to take the next step and start making more complex windows, niches, and other things to put in walls. As James Murray points out in my Stained Glass Window Tutorial (see link below), it’d be easy to turn that complex profile amalgam into a real window by taking the extra steps to save everything as a window. It’s also worth nothing that you can use things other than slabs to make these windows (Morphs for example).
I imagine you could use a similar process to make things like inset fire extinguisher cabinets, electrical equipment, and all sorts of other Objects that’d be nice to have hosted within a wall. Sure you’d have to place them as Window Objects, but so what. Does the name of the Tool really matter? It rarely does. I know many users who model all floors, ceilings, and roofs using only the Roof Tool (that way everything can be scheduled together, regardless of whether it has a slope of 0° or 89°). And speaking of the Roof Tool, once you make an Object you can change the Subtype to Skylight or Dormer and start dropping it into a Roof. The exact details of all that are a bit beyond the scope of this post (and I’ve found a few glitches along the way), but this allgives you something to explore. Also I should mention that making the 2D symbol look better is pretty easy. Here’s how.
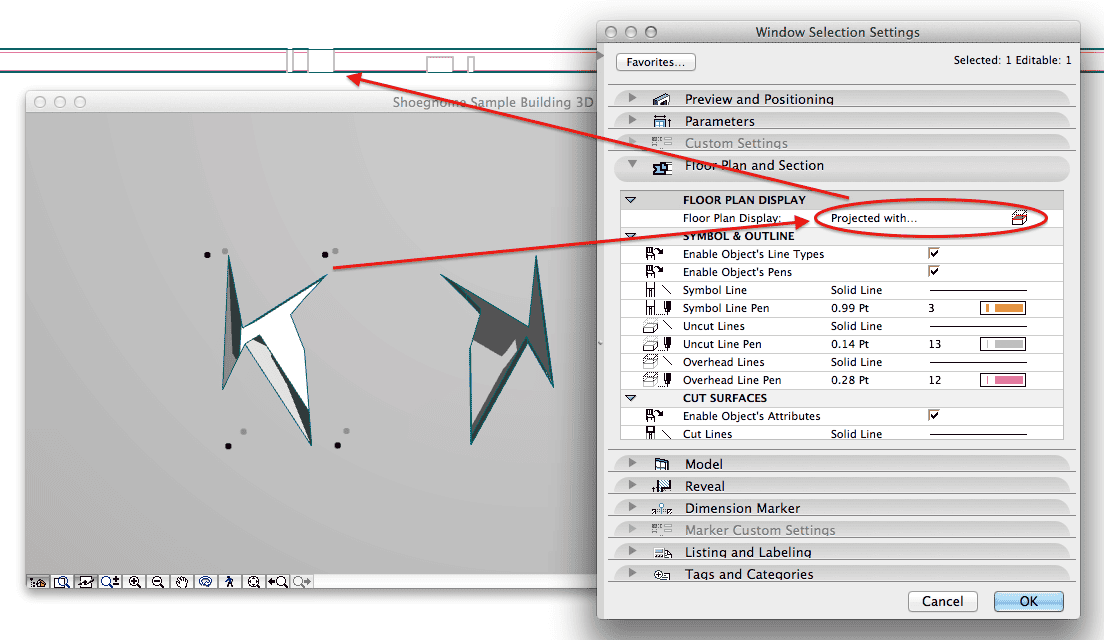
2/26/14 update: I should ALSO mention that to get the 2D symbol to display accurately, go to the Window Selection Settings / Floor Plan Display, and then change the Floor Plan Display from Symbolic to Projected or Projected with Overhead. This will make your window display accurately based on the Floor Plan Cut Plane (which means if the opening is too high or low you still might need to change the symbol via the video I link to above).
For more information, here are a few links that will be helpful:
- Stained Glass Window Tutorial (Shoegnome)
- Slabified Window (Onland)
- Custom Shaped Door & Window (ArchiCADwiki)
- Create a Custom Window (ArchiCADwiki)
- Create a Custom Opening (ArchiCADwiki)
Now I’m no ArchiCAD Object making wizard, and the above video doesn’t cover everything, but I hope you learned something. If you want more on basic object making in ArchiCAD, I’d be happy to record some more videos. And I’ll at some point discuss all the other ways to create holes in walls in ArchiCAD, because each solution has a lot of value.

Follow Shoegnome on Facebook, Twitter, and Youtube for more…
11 thoughts on “Custom Empty Openings in ArchiCAD”
I used to have a Wile E Coyote-on-the-cliff image that I’d use to teach people how to do that 🙂
Awesome. Awesome. Awesome.
I was thinking of your example Tom, before I even saw your comment…
http://archicad-talk.graphisoft.com/viewtopic.php?p=54825&highlight=wallhole+example#54825
I notice that when you make the irregular opening as a window, the Plan appearance always takes the full width of the opening, even if there are projections into that width. Also, when you used the shape as a niche, in Plan it appeared as a window (a hole the full depth of the wall.) Are there ways to fix this?
Good catch. There are two solutions. One is to make a custom 2D symbol for the element, which is easy to do (there’s a link above to a video on that). BUT what I should have shown in the video is that you can change the floor plan display from Symbolic to Projected or Projected with Overhead. Then the window will be cut accurately and the niche will show properly as well. This setting is in the Window Selection Settings (CMD+T on a Mac) under the Floor Plan Display tab.
I’ve updated the post to include this information as well.
Jared, How do you handle window sills? I’d like the Sill to be turned on so it integrates and updates with the window. But if I turn it on, I noticed that it makes the Window smaller… ?? (simple test: create a 4’0 tall window with a 2″ sill and one with a 2’0 sill.) I do residential architecture and this function does not reflect reality. Why does it do this? What is your work around?
It depends on the project. But, one thing never changes for me: set the window/door to the right size and never fake that. So if the window that needs to be ordered is 4′ x 2′, then that’s the size of the Object. Period.
The situation you’re dealing with I think is just a disconnect between the sill you’re talking about and what ArchiCAD is calling a sill in the window Object. What they show as a sill on the exterior of the window is just the bottom of the window unit, not an extra piece of trim. What I think you’re talking about is a piece of trim below the window, which the default window doesn’t have. Which is dumb. But it can be faked with the brick sill. Or if you need a sill that can’t just be represented as the bottom trim in the window, model it with a beam.
In general if the sill, trim, etc. can’t be done properly in the Object, then I’ll use columns and beams for the trim. Column beams interact with each other really well, can be easily worked on in any view, and also can have complex profiles applied to them. In ArchiCAD 17+, trim as beams and columns are fantastic because if you set your building materials correct, they can cut away the siding and look perfect in section. Better than object based trim can be.
For a typical project where the details aren’t intense (ie, not a lot of ganged windows or just very typical conditions), I’ll make due with the window Object’s trim options. But for a more detailed project, I prefer to turn off all the trim (interior and exterior) and model it separately as the trim often interacts with things other than the window and I want to focus on those alignments (say belt courses, door trim, other siding or columns or decoration…). Plus rarely is trim just a rectangular stock, which is another limitation of the default Objects.
so if you want a arch opening with columns and balusters how is this done
There is an arch top empty opening you can use. For the columns and balusters, they’d need to be modeled separately with whatever tools make the most sense (Columns, Morphs, Walls). I have also used Shells for this. It all depends on the detail of the opening and surrounding elements.
I have watched your video on creating a custom hole in a wall but when I do mine it does not take the shape I have created instead it remains with a rectangular opening and a slab in the centre. How can I handle that?
Make sure the slab you save has the ID wallhole. That sounds like the issue.