Creating wall and floor tiling plans in ArchiCAD
Creating wall and floor tiling plans in ArchiCAD can be a troublesome task. The abilities of built-in elements and textures of ArchiCAD are limited when it comes to modelling and arranging tiles. In order to make these tasks easier, you could choose to download and use [eptar]’s wall and floor tiling application for ArchiCAD. This application will not only help you draw your room tiling plan and create a 3D model at the same time, but will also make sure you get an exact calculation from the necessary components.
Using [eptar] Tiling ËAccessoriesË Add-On


With the help of [eptar] Tiling application you will be able to create complete wall and floor tiling plans. Your tiling plan can be attached to walls and slabs by using ArchiCAD’s ËAccessoriesË Add-On. The advantage of this method is, that your tiling plan will follow the changes of the walls and slabs. The program will create holes for your existing and newly made windows and doors in your tiling plan, too.
Tiling of window and door edges is simple. You can easily define these edges by using the moving hotspots around the openings on the geometric view of the wall.
It is also possible to create extra holes in wall and floor tiling plans. These holes are usually required behind and under bathtubs and other plumbing fixtures, and are used to create holes solely on the tiles not the walls or the slabs. Extra holes therefore can be rectangular on walls, but they can be rotated, dragged and shaped with less restraints on the floor.

Editing individual tiles and rows
You can edit your existing tiling plan any time you want to. Changes can be made in the Object Default Settings window or on the layout by using moving hotspots.
If you want to change the outlines of your tiling plan, you should use the Geometry View Mode on the layout. This view appears on the layout automatically together with wall tiling plans, but not with floor tiling plans. You can adjust this view mode in the Object Default Settings window, under the General Settings site. Extra holes, window, door and wall edges can be edited in this view mode as well.
If you want to adjust the texture of individual tiles or rows, the offset of tiles or the height of certain rows, you will need to use the Tile View Mode. You may also rotate the tiles or move the origin of your tiling plan.

Placing individual polygons and rectangles
The ArchiCAD ËAccessoriesË Add-On can not handle the tiling of curved, slanted or double slanted walls. You can however use individual poligonal or rectangular tiling objects to be able to create tiling plans for these wall segments too.
Individual polygons and rectangles can be used for tiling both walls and floors. All the adjustments mentioned in the Editing individual tiles and rows section above can be applied to these individual objects as well.
Tiling palette
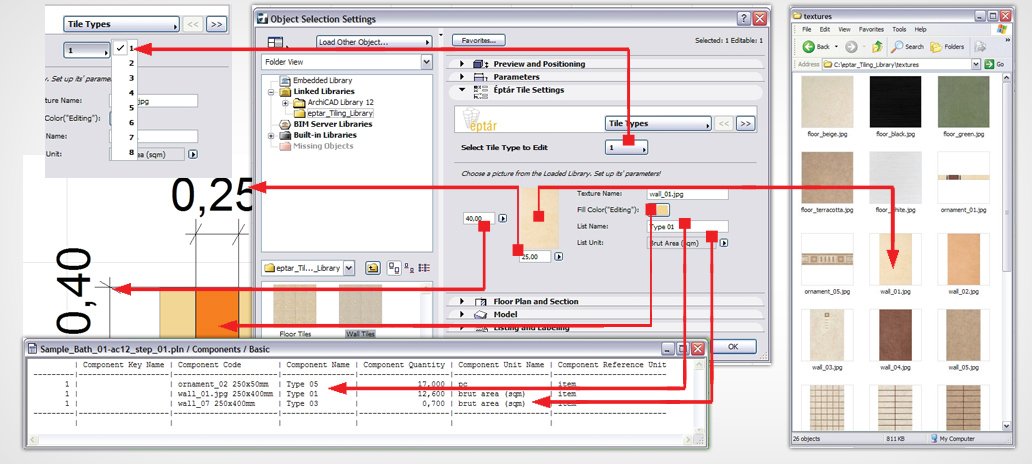
You can use tiles of different textures and sizes on your tiling plan. The pattern for tiles can be selected from the tiling palette on your layout. This palette can be found next to the Tile view mode. You can adjust the settings of the tiles of the palette in the Object Default Settings window. Individual textures can be defined by typing the file name of the pattern into the Texture Name box. The application can only call the textures from the textures folder in the eptar_Tiling_library folder. If you want to use your own patterns or textures, copy them into the textures folder mentioned above.
You can change the tiling palette globally in the Eptar Tiling Settings panel, that can be found under Document> Set Model View> Model View Options.
Component list
Component lists can be made by using the built in lisiting by ArchiCAD. Quantity of tiling elements can be calculated in gross or net square meters or in pieces, according to your wishes and settings.
Making elevation plans
Although [eptar] Tiling application was initially designed to make tiling plans, it can be used to draw and edit elevation plans for different modular wall facade systems. Tiling can be applied for both sides of the wall, and textures and size of tiling elements can be adjusted without restraint, therefore any modular cladding element can be represented by it.
The DEMO version of [eptar] Tiling and other useful tools can be downloaded from the eptar website: www.eptar.hu/cadsupport.php.
This application can be used if the eptar_Tiling_Library is added to the linked libraries in ArchiCAD. The Tiling application needs ArchiCAD ËAccessoriesË Add-On to function fully, however individual elements will work without the Add-On. The ËAccessoriesË Add-On is free to download from the Graphisoft website.
5 thoughts on “Guest Blogger Kata Danis: [eptar] Tiling Accessory for ArchiCAD”
Excellent!
Jared,
Take a good look at ArchiSuite in general … it has been around for years, and covers tiling, revisions, quantities, STAIRS, terrain modeling, free form modeling (still the only spatial 3D text), elevation photogrametry, even time sheets …
On top of that, Fabrizio is a gem of a person and a really, really knowledgeable guy
http://www.cigraph.it/en/node/101
Would any of these solve the problem with display order in elevations (with 2D and 3D fills) that resets between users in a Teamwork project (every TW-user has to define the display order in their respective computer). I was going to try Eptar but AC got silly about java and I don’t have more time right now to fiddle around…(we do the tiling as 2D fills in elevation…).
Mats, I’m not sure. Downloading the free demo would probably answer the question pretty quickly though. My guess is that the display order issue would be solved because there’d be more 3D and less 2D, so using a 3D tiling solution should make it a non-issue.
Also… did you catch the latest update from last week regarding Java 7 Update 13? https://shoegnome.com/2013/02/01/disabled-java-plugin-on-mac/ For now at least, the JAVA issue is resolved.
Pingback: Ekstraudstyr til ArchiCAD… | BIM Equity Blog
Pingback: Guest Blogger Kata Danis: Reinforcement plans in ArchiCAD » Shoegnome