This blog is about using BIM on a day to day basis. I cover ArchiCAD tips and tricks, BIM and management thoughts, and occasionally how this all relates to the Minnesota ArchiCAD Usergroup (which I started in 2009). The specifics are about ArchiCAD—that’s the software I use and sell—but the overall themes are relevant regardless of your software. Programs are just tools. BIM is a mentality.

Modify Wall – a video exploration of a great function

Posted: January 31st, 2012 | Author: | Filed under: Long Posts, Shoegnome on YouTube | Tags: , , , | 13 Comments »

It’s time to demystify walls AND make your coworkers think you have magical ArchiCAD powers…

Do you hate when walls don’t join properly or when hatch patterns in elevation randomly don’t align? In this video I talk about the Modify Wall menu and how it demystifies those issues. I won’t promise that the Modify Wall menu will solve every one of those problems. BUT once you are familiar with its abilities, you will always understand WHY those problems are happening.

In all these videos I try hard not to do too much with key commands. I want everything I do to be clear. But I have to admit I use two key commands a lot in this video without mentioning what I’m doing. One is Intersection (for me CMD+I), which will extend or shorten two walls so that they connect. The other is Undo (and redo, probably). Sorry about not mentioning that. So when you see things happening on screen as if by magic, it’s probably one of those two commands. Hopefully it just highlights the importance of key commands!!!


TVs, Plotters, Computer Screens, Paintings, and Self Promotion

Posted: November 28th, 2011 | Author: | Filed under: Long Posts | Tags: , , , | 3 Comments »

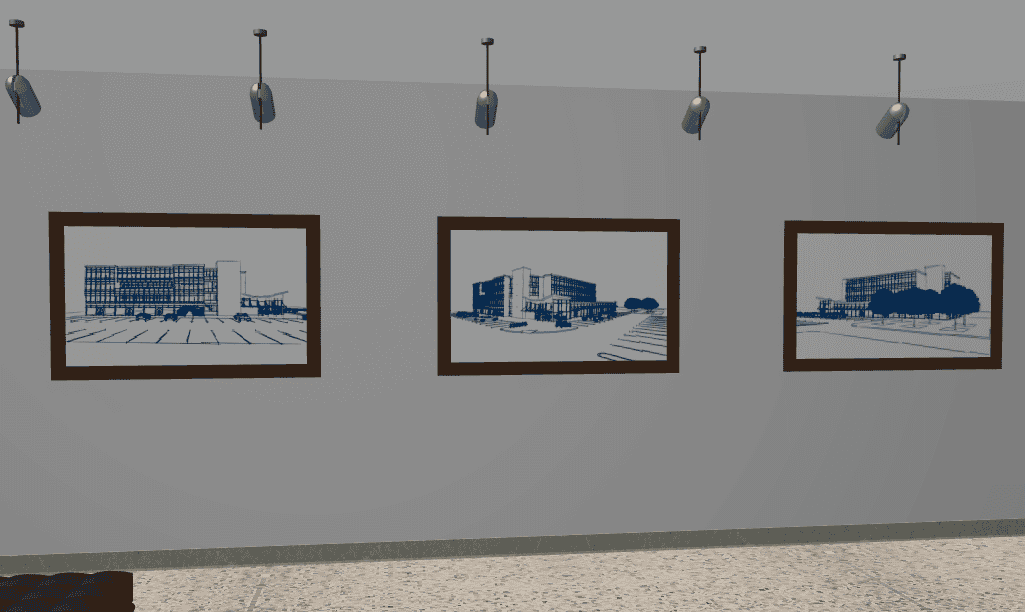
Paintings and the Art of Self-Referencing

A year ago I wrote about putting paintings and wall art in models. I recommended a trick using walls, niches, and aligning 3D textures. It’s a good technique, but I have to admit that I now rarely use it for hanging pictures. I finally got around to using the Picture 15 object. It’s great and fast. Put whatever image you want in your loaded library, choose custom picture and then type in the image’s name that you want to use. Very easy. If you want to avoid distortion of the image, you’ll need to know the proportions of the image so that you can size the object properly; the object won’t size itself automatically. It’ll just squish the image.

While hanging a picture in a model is easy, choosing what to hang is a lot harder. In my first endeavor, I hung a Klimt. It’s been a running joke with the clients, who are both art lovers and collectors. I’m tempted to frame a poster of the painting and give it to them as a housewarming gift. But their taste in art is so impeccable, a joke poster would get dusty in a closet. And while it’s been fun to see this priceless piece of art in the model, it doesn’t reinforce the design or the feeling of being in the space. So what else could be hung? For critical collections, I’d recommend photographing all the art a client has and hanging it virtually. Doing a museum? Include the art. That’s a no-brainer. This is where visualization and pretty models start reinforcing the ‘I’ in BIM.

Fake Art

But what do you do if you have no art collection and you don’t want to crib masterpieces? What about hanging images of the project as paintings? I did this for a recent project. It’s an office building and I had a lobby space that needed something on the walls. I took some abstract sketch renderings of the exterior and hung them as art. Now the lobby has more character and charm. And more importantly the client, as he explores the model within BIMx, ArchiCAD, or via still images, is seeing what he hired me to create. It’s also a great opportunity to highlight specific vignettes and moments that I love in the project. My clients with the virtual Klimt are looking at a Klimt in their soon to be real home. Why not have them look at images of the house? That’s what they are paying for. And there’s just something beautiful and surreal about images of the 3D model within the 3D model.

In this example I used the default blaureiter setting, but I think most of the Sketch Rendering options could produce great fake art. Photo realistic images would probably work just as well, but might be too distracting if done wrong. More on that in a moment.

TVs, Plotters, Computer Screens, and Self Promotion

Just like the Picture 15 object, the TVs, monitors, computers, and laptop objects can all have custom pictures on their screens. It’s the same process as the Picture 15 object. Why not set the computer screens to your company logo or perhaps your website? If it’s a professional client, put their logo up on all the screens. Many residential clients are also business owners–show those logos or iconic products. The model is a representation of the clients future building. Infuse it with images they love and care about. Though probably avoid framed photos of their kids and spouses, as that might go from cool to creepy, perhaps falling into the Uncanny valley.

The plotter in the image below uses the same premise as the screen-type objects, but instead of a custom picture, I created a new material with the Shoegnome logo and applied it to the paper. Why print white paper when you can actually PRINT something. Why not get super self-referential and have the plotter printing plans of the building? That wouldn’t be hard. And I bet your clients would flip out with excitement.

This is probably a good time to mention that in the actual model, the plotter was printing the client’s logo and all the TVs and most of the computer screens had the clients various products and logos on them.

Paintings to TVs… Art History Comes Full Circle

So remember the post about paintings and frames and how I no longer use that technique for paintings? Well I still use that trick. But now for TVs and other screens that don’t have objects that meet my needs. The TV in the image below (based on a 42″ VIZIO flat screen) is a complex profile wall that is the extrusion of the TV, with 2 complex profile beams for the built in speakers. I used beams because, with a higher priority number than the wall, they cut out the wall that is the body of TV without the need for Solid Element Operations. For the screen I used the niche object and followed my old painting steps.

I’ve got a lot more to say, but I’ll end with this…

When we photograph a completed building we take care to stage the images. We should do the same with our models. The techniques may be different, but the philosophies are the same: stage it to show off our design and make it attractive to our audience.


Paintings and Frames

Posted: January 3rd, 2011 | Author: | Filed under: Short Posts | Tags: , , | 1 Comment »

There are a couple ways to hang a picture in an ArchiCAD project. There is an object which I can never find in the library when I look for it. There’s also the object mentioned in this forum post. My preferred solution is to place a wall that is as wide, deep, and high as the desired frame (say 2′-11 1/2″ x 4′-8″ x 1″). Then place a niche into the wall that is the size of the picture and 1/4″ deep (so in this case 2′-3 1/2″ x 4′-0″ x 1/4″). Then set the niche tool to a material that is your painting. Align the material in 3D and you’re set.

To make the material: create a material that has the painting as a jpg. Set the jpg size to your niche size (2′-3 1/2″ x 4′-0″)

A little complex, but really versatile and fast once you’ve done it once. And it uses skills you should learn regardless (the niche, align 3d texture, and material creation). If you use a generic material to represent ‘painting’ (aged copper for instance), then you can skip the material making and aligning. This technique also works great for mirrors with frames (in my template I have a mirror material).


Aligning 3D Textures on Slabs

Posted: December 31st, 2010 | Author: | Filed under: Short Posts | Tags: , , | 1 Comment »

Aligning 3D textures in ArchiCAD should be easier.  It needs to be done in 3D and this can be tricky if you don’t have a node in the right place to snap to. Sometimes I’ll make a temporary object or one that will stay invisible to have a point to click to if the texture starts in a weird spot, or if I want a lot of textures to all align to a fixed point. Why can’t we align a texture on a wall from an elevation view? This is annoying.

Slabs offer one exception. Here it is:

Select your slab, add Fill Type to plan, check Use Fill of Surface Material, then select Fill Orientation: Editable Fill Handle. The 3D texture will move in conjunction with the 2D fill shown in plan and however you orient the fill on the plan will be matched in 3D. Unfortunately Distorted Fills in plan don’t change the texture in 3D.

For another great look at aligning 3D textures, check out this tip from GSCNE, Inc.. GSCNE, Inc. has been the Canadian distributor of ArchiCAD since 1987 (or to put it another way, since I was six years old). Their FAQ list for ArchiCAD is insanely good. You will read it and become smarter.